

How to Create a Custom API Page in Business Central?
One of the best ways to integrate Microsoft Dynamics 365 Business Central with other systems is through APIs. They allow you to trigger Business Central logic via linked actions and expose data in a structured, secure, and scalable way.
In this article, you will learn how to create a custom API Page in Business Central, which can later be used as a data source in a Power App.
Imagine a scenario where you want to display a new field from your Employee table—such as the Employee Card Number—inside your Power App. What steps would you need to take?
According to the official Business Central API documentation https://learn.microsoft.com/es-es/dynamics365/business-central/dev-itpro/api-reference/v2.0/, if you want to expose your own custom fields, you must build your own API.
Below, I’ll show you how to do it.
Creating the Extension and API Page
First, you must have an extension that includes the new field. Here is an example of the table extension and the Employee page extension:


In Business Central, the Employee Card would look like this:

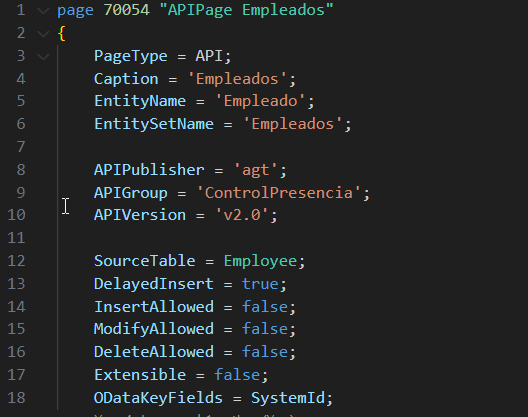
We can easily create our API page using the tpage snippet — specifically, the Page of type API template. This automatically generates the basic structure for us.

Let’s define the most important properties of the API page:
- APIPublisher: The name of the publisher. For example, your initials or your company’s initials.
- APIGroup: The name of the group. Typically the name of the extension or application it belongs to.
- APIVersion: The version of your API. I usually set it to v2.0 to differentiate it from the standard APIs.
- EntityName: The name of the entity. For example, employee.
- EntitySetName: The name of the entity set — the plural form of the entity, such as employees.
- SourceTable: The table from which the data is retrieved.
- delayedInsert: Indicates whether the record should be written to the database. Set this to true.
- InsertAllowed : Specifies whether new records can be inserted.
- ModifyAllowed: Specifies whether records can be modified.
- DeleteAllowed: Specifies whether records can be deleted.
- Extensible: Determines whether the object can be extended.
- ODataKeyFields: Used to uniquely identify records when accessed through OData services. It is recommended to define this when building a custom API.
Regarding the fields we want to include in the app, we simply add them to our API page.

Connecting Power Apps with Business Central
The next step is to go to Power Apps and create the connection to Business Central.
My colleague Eduardo Marín has a detailed post explaining how to connect Business Central with Power Apps: https://www.abd.es/2020/06/power-apps-y-business-central-ya-estan-conectados/
In Power Apps, go to "Create", and then select "More data sources".

We select the Dynamics 365 Business Central (cloud) connector, choose the dataset we want to connect to, and finally select the table exposed through our custom API. Then we click OK to generate the canvas app.


The Power App is generated with the three standard views — Gallery, Edit, and Details — for the Employees entity, and it already includes our new field, Card Code.

From this point on, we can build our Power App using the custom fields from any extension.
You can find more information in the official Microsoft documentation.
I hope this post has been very helpful. In upcoming articles, we will continue exploring more technical and functional aspects of Power Apps.
Dynamics 365 Development
ABD Consulting and IT Solutions