

Email remains one of the main communication channels in companies and also one of the most commonly used attack vectors by cybercriminals.
That’s why properly configuring email authentication is essential. One of the most important technologies to achieve this is DKIM in Microsoft 365, a mechanism that allows verifying the authenticity of messages sent from your domain.
In this article, we explain what DKIM is, why it’s important, and how to enable DKIM in Microsoft 365 step by step, following the procedure shown in the short video created by our technical team.
What DKIM is and why it is important for email security
DKIM (DomainKeys Identified Mail) is an email authentication method that makes it possible to verify that a message:
- really comes from the domain it claims to be sent from
- has not been modified during its transit over the Internet
In other words, it acts as a digital signature for the email.
When DKIM is enabled:
- The mail server signs the message with a cryptographic key.
- The receiving server validates that signature through the domain's DNS.
- If the verification succeeds, the message is considered legitimate.
This helps prevent issues such as:
- identity spoofing (spoofing)
- phishing attacks
- fraudulent sending of emails from your domain
In business environments that use Microsoft Defender for Office 365, DKIM is a key component of the email protection strategy.
How to check if DKIM is enabled in Microsoft 365
To verify if DKIM is enabled in your organization, you can do so directly from the Microsoft 365 Admin Center.
The process is simple.
Step 1: Access Microsoft Defender
First, you need to access the Microsoft Security Portal, within the section of Microsoft Defender.
From there, you'll have access to configurations related to:
- email security
- threat protection
- message authentication
Step 2: Go to mail and collaboration settings
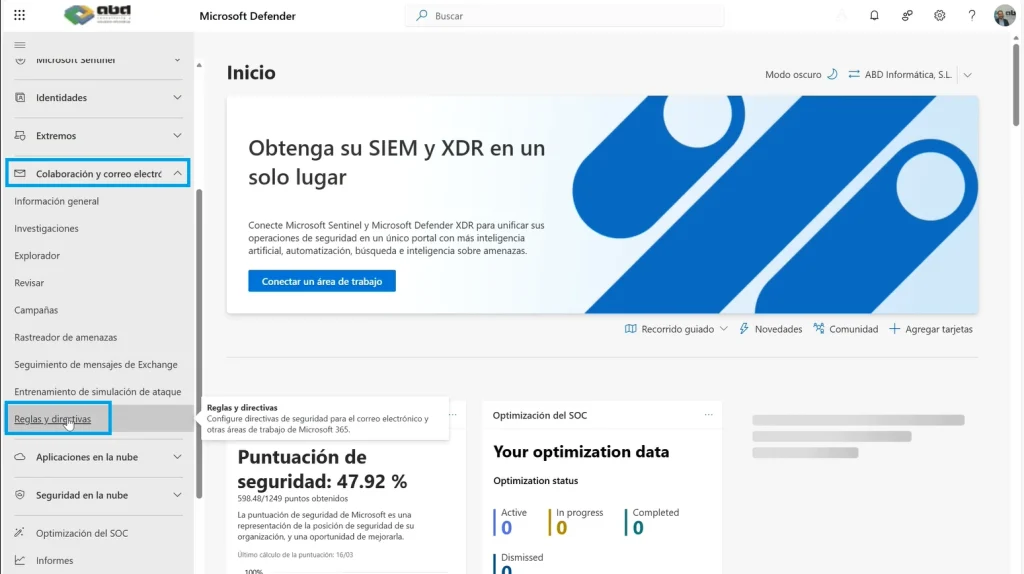
Within the security panel:
- Access the Email & collaboration section.
- Select Rules and policies.
- Then go to Threat policies.
In this section you'll find several configurations related to email protection.
One of them is Email authentication settings.
Step 3: Check DKIM status in your organization
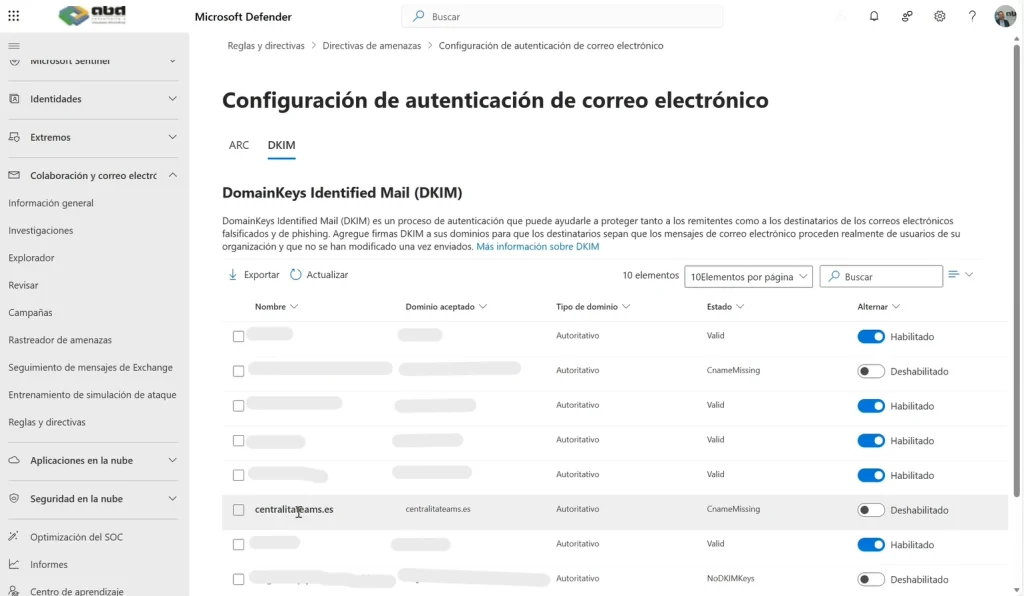
Within this section you can check the DKIM status for all domains configured in your tenant.
Microsoft will display a list where you can see:
- which domains have DKIM enabled
- which domains don't have it configured yet
This is especially important if your organization uses multiple email domains.
How to enable DKIM in Microsoft 365 step by step
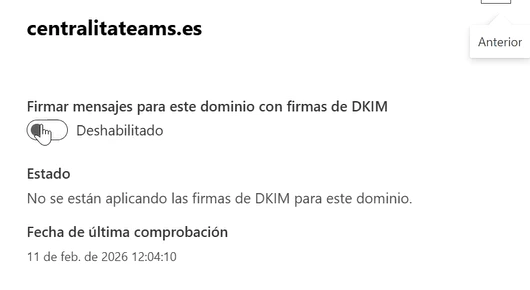
If you detect that a domain doesn't have DKIM enabled, you can activate it easily from the same panel.
Step 1: Select the domain
Select the domain that doesn't have DKIM active.
The system will show you the option to enable DKIM.
Step 2: Configure CNAME records in DNS
To enable DKIM, Microsoft will provide you with CNAME records that you must add to your domain's DNS.
These records allow mail servers to:
- locate the public key
- validate the message signature
This process is usually done in the domain provider's DNS management panel.
Step 3: Automatic verification
Once the CNAME records have been added:
- you return to the Microsoft 365 panel
- you click enable DKIM
The system will automatically check if the DNS records are configured correctly.
If everything is correct, DKIM will be enabled for that domain.
Best practices for email authentication
Enabling DKIM is just one part of the email security strategy.
For complete protection, it is also recommended to implement:
SPF (Sender Policy Framework)
Allows you to specify which servers are authorized to send emails from your domain.
DMARC
DMARC combines SPF and DKIM to apply additional security policies and prevent spoofing.
According to various cybersecurity studies, more than 90% of cyberattacks begin with an email, so properly configuring these technologies is essential.
Practical example: why enabling DKIM protects your company
Imagine an attacker tries to send emails impersonating your corporate domain.
Without DKIM:
- the receiving server may not detect the forgery
- the email may reach recipients
With DKIM:
- the receiving server detects that the signature is not valid
- the message may be blocked or marked as suspicious
This helps protect your domain's reputation and your customers' trust.
Protect your email with DKIM in Microsoft 365
Properly configuring email authentication is a basic security measure for any company.
Enable DKIM en Microsoft 365 allows:
- verifying the authenticity of sent emails
- preventing identity spoofing
- improving corporate email security
If your organization uses Microsoft 365, reviewing this configuration can help you reduce risks and improve threat protection.
ABD helps you protect your Microsoft 365 environment

At ABD Consulting and IT Solutions we help companies protect their cloud environment and optimize their Microsoft solutions.
Our team has certified specialists in technologies such as:
- Microsoft 365
- Microsoft Azure
- advanced security with Microsoft Defender for Office 365
We can help you with:
- email security audit
- SPF, DKIM and DMARC configuration
- protection against phishing and malware
- optimization of your Microsoft 365 environment
If you want to improve the security of your corporate email or resolve any technical questions, our team will be happy to help you.